Homework 1
- Due: See homework page
- Written portion: Submitted on Gradescope
- Coding portion: Use Github Classroom link given at the start of the Coding portion of this page.
Updates
- 2026-01-14: Written portion is officially released. Coding portion to be released tomorrow.
- 2026-01-15: Coding portion is released.
-
2026-01-20: Earlier versions mentioned that you should put your answers in
hw1.txtand submit that as part of your homework repo. For Spring 2026, you should ignore those instructions as you will simply submit your written answers on Gradescope. -
2026-01-22: Automated tests released in the
resourcesrepo. Near the end of this writeup there are directions for how to download, copy, configure, and run the tests. - 2026-01-22: Updated the lab1 writeup to help with some of the git questions.
Written Portion
Problem 1 - Course Policies (15%)
Carefully study the information on the course web site, then answer the following questions about course policies:
Part (a):
How many excused absences do you have for labs?
Part (b):
If you have used your excused absences and miss another lab, it will only be excused if…
- you request another absence
- you really need to attend an extra-curricular club trip or competition.
- USC campus support indicates an emergency has occurred
Part (c):
You must be available on the scheduled Exam dates, and NO alternative times will be provided (except for students with accommodations taking the exam at OSAS).
- True
- False
Pard (d):
While use of generative AI is not strictly prohibited on Homeworks, it is strongly discouraged since exams will require you to apply coding skills and concepts applied in the homework. Read the section in the syllabus about generate AI, in particular:
Even if you write significant code on your own, as soon as you ask AI to generate an outline of how to approach the code or help debug some code you’ve written, etc. you have ALREADY lost valuable learning experience, much less if you start by asking AI to write significant portions of code for you. Only through failure and the ensuing struggle will you develop the mental skills and recall needed to perform well on the exams, and develop understanding needed for larger tasks in the workplace.
Take a few moments to reflect on this statement. What aspects do you agree with and which do you disagree? Why? How will you approach homeworks, and what will you do when your code doesn’t work or you don’t know how to approach a problem?
Part (e):
If you forget to push a file in your submission, but your code worked on your laptop, you can submit a regrade.
- True
- False
Part(f):
You may submit homeworks up to 4 days late for a -20 deduction.
- True
- False
Problem 2 - Git (10%)
Carefully review the Lab1 procedure (i.e. webpage) and slides linked on the course website or shared folder. Then, answer the following questions:
Part (a):
When cloning a Git repo, the following can lead to errors:
Cloning into a folder that itself is a git repo.
- Is fine
- Can lead to errors
Part (b):
When cloning a Git repo, the following can lead to errors:
Cloning into a sync’ed folder like Dropbox or Google Drive.
- Is fine
- Can lead to errors
Part (c):
When cloning a Git repo, the following can lead to errors:
Cloning into your cs104-repos folder.
- Is fine
- Can lead to errors
Part (d):
What git command would stage an untracked file to be committed.
git statusgit pushgit addgit stage
Part (e):
What git command would display the details of the last three commits in a repository.
git statusgit log -3git commit -m "3"git pull 3
Part (f):
What is the full command to re-clone the resources CSCI104 repo? Assume you are in an appropriate folder.
- git pull https://github.com/usc-csci104-spring2026/resources.git
- git clone usc-csci104-spring2026/resources
- git init; git pull resources
- git clone git@github.com:usc-csci104-spring2026/resources.git
Problem 3 - Runtime Analysis (50%)
In Big-Θ notation, analyze the running time of the following three pieces of code/pseudo-code. Describe it as a function of the input (here, n). Submit EACH problem separately. Your submissions should be a PDF or JPG (using some kind of equation / math software or scanned handwritten notes) showing your work (derivations of T(n), summations, and steps you used to arrive at your final answer.
As usual, answers without supporting work will receive 0 credit.
Part (a)
void f1(int n)
{
    int i=2;
    while(i < n){
        /* do something that takes O(1) time */
        i = i*i;
    }
}
Part (b)
void f2(int n)
{
    for(int i=1; i <= n; i++){
        if( (i % (int)sqrt(n)) == 0){
            for(int k=0; k < pow(i,3); k++) {
              /* do something that takes O(1) time */
            }
        }
    }
}
Part (c)
for(int i=1; i <= n; i++){
  for(int k=1; k <= n; k++){
    if( A[k] == i){
      for(int m=1; m <= n; m=m+m){
        // do something that takes O(1) time
        // Assume the contents of the A[] array are not changed
      }
    }
  }
}
Part (d)
Notice that this code is very similar to what will happen if you keep inserting into an ArrayList (e.g. vector). Notice that this is NOT an example of amortized analysis because you are only analyzing 1 call to the function f(). If you have discussed amortized analysis, realize that does NOT apply here since amortized analysis applies to multiple calls to a function. But you may use similar ideas/approaches as amortized analysis to analyze this runtime. If you have NOT discussed amortized analysis, simply ignore it’s mention.
int f (int n)
{
  int *a = new int [10];
  int size = 10;
  for (int i = 0; i < n; i ++)
     {
        if (i == size)
          {
             int newsize = 3*size/2;
             int *b = new int [newsize];
             for (int j = 0; j < size; j ++) b[j] = a[j];
             delete [] a;
             a = b;
             size = newsize;
          }
        a[i] = i*i;
     }
}
Problem 4 - Linked List Recursion Tracing (25%)
Consider the following C++ code.
All of the points for this problem will be assigned based on your explanation, since we have full faith in your ability to run this program and copy down the answer.
struct Node {
    int val;
    Node*  next;
};

Node* llrec(Node* in1, Node* in2)
{
    if(in1 == nullptr) {
        return in2;
    }
    else if(in2 == nullptr) {
        return in1;
    }
    else {
        in1->next = llrec(in2, in1->next);
        return in1;
    }
}
Part a
What linked list is returned if llrec is called with the input linked lists in1 = 1,2,3,4 and in2 = 5,6?
- 1 5 6 2 3 4
- 1 2 3 4 5 6
- 1 5 2 6 3 4
- 5 1 6 2 3 4
- None of these
Part b
To show work, you can draw a call tree or box diagram of the function calls using some simplified substitution of your choice rather than pointer values (e.g. “p3” for a pointer to a node with value 3). Submit your answers as a PDF (using some kind of illustration software or scanned handwritten notes where you use your phone to convert to PDF) showing your work and derivations supporting your final answer. You must name the file.
Part c
What linked list is return if llrec is called with the input linked lists in1 = nullptr and in2 = 2?
No need to show your work on this problem.
-
- 2
- 2 0
- None of these
Problem 5 - NOT GRADED (PRACTICE ONLY) - Constructors and Destructors (0%)
Suppose you were given the following class to model an entry in your contacts list which uses a custom Str class that models a string and replaces std::string.
#ifndef ENTRY_H
#define ENTRY_H
#include "str.h"

class Entry {
 public:
  Entry(const Str& name, const Str& phone);
  ~Entry();
  const Str& name() const;
  const Str& phone() const;

 private:
  Str name_;
  Str phone_;
};
#endif
Further assume that print statements are added to all constructor and destructors that print:
-
Strin the default and initializing constructor(s) -
~Strin the destructor -
Copy Strin the copy constructor - Nothing is printed in the assignment operator(s)
Question a: If the Entry constructor is as shown below, what will be printed when a new Entery object is constructed.
Entry::Entry(const Str& name, const Str& phone)
{
  cout << "Entry" << endl;
  name_ = name;
  phone_ = phone;
}
Question b: If the Entry constructor is as shown below, what will be printed when a new Entry object is constructed.
Entry::Entry(const Str& name, const Str& phone)
  : name_(name), phone_(phone)
{
  cout << "Entry" << endl;
}
Now suppose a new Wrapper class is written that uses an Entry as a data member as shown below.
#ifndef WRAPPER_H
#define WRAPPER_H
#include "entry.h"
class Wrapper
{
 public:
  Wrapper(const Str& name, const Str& phone);
  void print() const;
 private:
  Entry e_;
};
#endif
Question c: Show how to complete the constructor such that the data member e_ is initalized with the arguments name and phone. Be sure to avoid any compile errors or runtime errors. You can always try your code out using a compiler. Show the entire constructor in your answer (i.e. start by copying the code below and then add to it).
// initialize e_ with name and phone
Wrapper::Wrapper(const Str& name, const Str& phone)
{

}
Coding Portion
Github Classroom URL
Signup link to create your HW1 repo: signup link
A Few Notes on Repositories
- Never clone one repo into another. If you have a folder named
cs104-reposfrom your Lab 0 stup and you clone your HW1 repo provided by Github Classroom under it (i.e.cs104-repos/hw1-ttrojan) then whenever you want to clone some other repo, you need to do it back up in thecs104-reposfolder or other location; NOT in thehw1-ttrojanfolder. - Each coding homework will be started via Github Classroom via a customized startup link (usually listed at the top of the homework). To
cloneit and then push files to it, you’ll need to have setup your SSH keys as described in the Lab 0 writeup on the Labs Page. If you’ve followed those steps, used the Github Classroom sign up link (following any directions it indicates) and still cannot access your repository, you can then make a private post on the class Q&A or visit TA office hours. In any Q&A post, be sure to include your USC username and github username for reference.
Clone your HW Repo
- In your coding environment setup in
lab0, navigate to yourcs104-reposarea (e.g.cd cs104-repos). -
Clone your repo:
git clone git@github.com:usc-csci104-spring2026/<your_hw1_repo> - In the VS Code editor, choose
File..Open Folderand then find and open that folder (i.e.cs104-repos/<your_hw1_repo>)
Problem 6 - Unrolled Linked List (65%)
Unrolled Linked List
Overview
An unrolled linked list, is a normal linked list (doubly-linked in this case) but each node/item does not store a single data value but an array of values. The head and tail nodes of the linked list may have arrays that are not fully occupied so we keep first and last index to indicate where the first actual data item exists in the array (this index is inclusive) and the last data item exists (this index is exclusive and points to one beyond the last value). These arrays provide better underlying memory performance in most computers (due to caching effects that you’ll learn about in CS 356 or EE 457) and can be more space efficient.
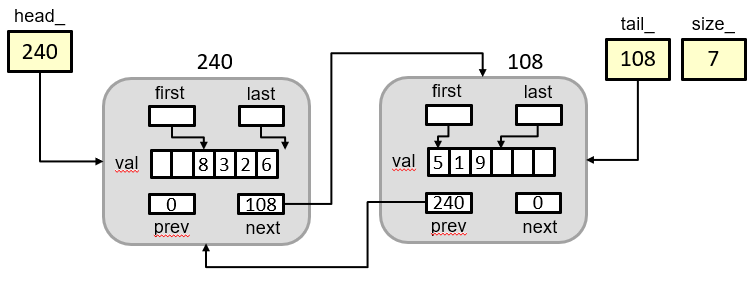
In the image above we see each Item struct has a next and prev pointer as would be typical in a doubly-linked list. Then, rather than a single value, it will contain an array of a fixed size where multiple items can be placed. To track which items are used a pair of indices is used of the form: [first, last) where first is inclusive and is the index of the first used item and last is the index 1 beyond the last used index. This approach allows more natural iteration and allows computing the number of items in the range through simple subtraction (i.e. last-first). As an example, first=last=0 indicates no items are used and first=0 and last=10 indicates the 10 elements are occupied (from indices 0..9).
To track the head Item, tail Item, and size of the linked list (i.e. number of strings stored in the entire list), the head_, tail_ and size_ members of the ULListStr class are used, respectively.
The unrolled list we implement will store strings. For the sake of this homework, we will only ask you to implement the ability to add or remove a value from the front or back of the list (and not in the middle of the list). Each of these operations should run in time O(1). Pushing to the front or back should NOT require moving any values. When pushing to the front, only allocate a new Item if the current head Item has no room before the first Item. When removing an item, only deallocate an Item when the number of used values in its array reaches 0. This means there should not be “empty” nodes in the list…when no more array entries of an Item are used, deallocate the Item.
Procedure
- You need to examine the code provided in
ulliststr.handulliststr.cppand add the implementations forpush_back,push_front,pop_back,pop_front,back,frontandgetValAtLocinulliststr.cpp.-
Below is an example sequence of options:
ULListStr dat; dat.push_back(7); dat.push_front(8); dat.push_back(9); cout << dat.get(0) << " " << dat.get(1) << " " << dat.get(2) << endl; // prints: 8 7 9 cout << dat.size() << end; // prints 3 since there are 3 strings stored - Here is a video explanation for some of the possible implementation approaches.
- Do NOT change any of the public member function signatures or private data members, though you may add additional member functions or data members if you deem them useful.
-
getValAtLocis a private helper function which will return a pointer to thei-th value in the entire list (not just in a single Item’s array) and is used in several other member functions. If a non-existent location provided togetValAtLocshould cause it to returnNULL. - As you implement these member functions be sure to meet the RUNTIME requirements.
- To repeat, any comments provided in the skeleton file act as requirements that you should meet.
-
- After completing the functions above, you should use a separate program named,
ulliststr_test.cpp, to test your implementation. To test a data structure such as this, you should allocate one of yourULListStritems and make calls topush_back,push_front,pop_back,pop_front,backandfrontthat will exercise the various cases you’ve coded in the functions. For example, if you have a case inpush_backfor when the list is empty and a separate case for when it has one or more items, then you should make a call topush_backwhen the list is empty and when it has one or more items. It is important that when you write code, you test it thoroughly, ensuring each line of code in theULListStrclass is triggered at some point. You need to think about how you can test whether it worked or failed as well. In this case, calls toget,size, and others can help give you visibility as to whether your code worked or failed.
To give you a model, we have provided a function named basicTest() in the ulliststr_test.cpp. Feel free to use it or modify it as you please. It is up to you to determine the correct, expected values and then verify your code produces that.
To compile a program of multiple files you must list ALL the .cpp files in the g++ command line AND NEVER compile a .h file on the g++ command line. Thus, your compilation command would look like:
g++ -g -Wall ulliststr.cpp ulliststr_test.cpp -o ulliststr_test
However, we have provided a Makefile which is a script with compilation commands so you don’t have to type the above command. Instead, just type:
make ulliststr_test
Your MISSION is to try to find and fix all the bugs in your implementation using YOUR own tests, so that when we release the official tests, they pass the first time.*
Wrapping Up
Finally, ensure your solution does not access memory incorrectly or leak memory. Use valgrind to verify correct memory handling and cleanup.
Do NOT place a main function in the class file: ulliststr.cpp (it should be in your test file: ulliststr_test.cpp).
Please do not change the filenames of the skeleton we give you.
Problem 7 - Linked List Recursion Coding (35%)
Write a program that reads two lists of integers specified in a text file with integers separated by spaces on two lines (and only two lines) of the file into two singly linked lists. Then use recursion to:
- Recursively remove consecutive integers that are equal from the first list (only keeping one)
- Makes a new list (i.e. copying the items in the list) such that the new list contains the concatenation of the first and second list using recursion
Thus if the input file was:
1 3 3 3 5 9 7 7
2 4 4 4
you would output:
1 3 5 9 7 2 4 4 4
Each of the two operations above should be implemented as separate recursive functions (you can feel free to define helper function if you want a different signature) that should be called in succession as in:
removeDuplicates(head1);
head3 = concatenateLists(head1, head2);
These recursive functions should not contain any loops. If you do use loops in these functions you will receive a 0.
Using the Item definition and prototypes in the provided rem_dup_lib.h from the resources/hw3 folder.
Write the definitions for the two functions in a file rem_dup_lib.cpp. You are welcome to define recursive helper functions if you like in this file. Again, no loops are allowed in these function nor any helpers you define.
Finally, complete the test program (in rem_dup.cpp) that will read in the integers from a file into the two lists, call removeDuplicates on the 1st list and the call concatenate on the resulting 1st and original 2nd list. We have completed the main() which will make the appropriate sequence of calls. You only need to complete the function to read in the 2 input lists from a file: readLists. You may use loops for reading in the numbers. Do NOT define any classes or use STL structures. Note: readLists will need to produce 2 outputs (head1 for the first list and head2 for the second)…and you can’t return 2 values from a function in C++. Thus you’d need to pass in the pointers by reference as either:
void readLists(const char* filename, Item*& head1, Item*& head2);
or
void readLists(const char* filename, Item** head1, Item** head2);
Feel free to add other arguments to these functions if you need; we’re just showing how you’d have to pass the head pointer.
We will test rem_dup_lib.cpp/.h separately but please use the rem_dup.cpp program to test your code. The usage for rem_dup.cpp (after you compile to a rem_dup executable) is:
$ ./rem_dup input.txt output.txt
Your input should be read from the filename given as the 1st command line argument. Your output show be stored in the filename given as the 2nd command line argument.
There will be no formatting errors in the input file, though each of the two lines may be blank (have no numbers) which indicates an empty list.
Memory should not be leaked when you remove consecutive equal items and all items should be deleted at the end of the program.
Ensure your Makefile must have a rule rem_dup to compile this program and that rule should also be listed under your all rule.
Testing
We strongly recommend you test your code yourself, considering what inputs would be good to exercise the features of your code and its handling of various cases. Consider also what you EXPECT your code to do for each of the input scenarios you come up with. Then run your code to see if your ACTUAL code results in the what you EXPECT. Debug and fix any issues as much as possible before moving on to the automated tests. Its faster to debug a test scenario you’ve come up with (since you understand it) rather than understand OUR scenarios if something doesn’t work. Use our automated tests only after you’ve debugged your code well.
Debugging with your Own Tests
For the test cases (main() functions in ulliststr_test.cpp and rem_dup.cpp) we have provided VS Code debugger configs in .vscode/launch.json under your repo folder.
Click the debug view icon in your VSCode setup:
![]()
Then at the top of the view, use the drop-down box to choose which configuration (program) you want to debug.

Then click the green-arrow next to the drop down to start debugging. Be sure to set breakpoints first.
For programs that require command line arguments, you can alter which arguments to use by editing the .vscode/launch.json file. For the remdup test, change the input file you want to provide when you debug by modifying input.txt to a different filename or the output file name.
        {
            "name": "(gdb) Launch rem_dup",
            "type": "cppdbg",
            "request": "launch",
            "program": "${workspaceFolder}/rem_dup",
            "args": [
                "input.txt",
                "output.txt"
            ],
Automated Test Code
We will release the automated tests separately from the starter code and your Git repo (usually a few days after the assignment is released). Since you will have already created your homework assignment repo, we generally release these tests by simply placing them in the resources repo in subfolders like hw1_tests, hw2_tests, etc. just like your labs. If you successfully completed lab0, you should already have cloned the resources repo. But if not, you should go to your cs104-repos clone this repository to your laptop (but, again, only if you have not already done this as part of lab0)
$ git clone git@github.com:usc-csci104-spring2026/resources
Again, be sure you don’t clone this repo into some other repo but at some higher up point like in your cs104 or cs104-repos folder on your laptop.
When we announce the release of the tests, you can then manually copy (in your OS’s GUI or at the command line) the test files from resources/hw1_tests to your homework repo from Github classroom and add/commit/push the new files.
For example if you are in the folder containing both the resources and hw1-ttrojan folders/repos, you could enter the following command at the terminal:
$ cp -rf resources/hw1_tests hw1-ttrojan/
Again be sure to replace hw1-ttrojan with your repo’s name.
Once you have done this, follow these instructions for running the automated tests.
Submission Files
-
Add, commit and push your source files including all the
.cppand.hfiles andMakefile. -
Do NOT add/commit/push
.ofiles or executables (things that the compiler can easily generate anytime we need). If you want to avoid adding files you should not, you can add the following lines to your.gitignoreand then save, add, commit, push the.gitignore
<any previous contents>
*.o
ulliststr_test
rem_dup
Do NOT commit/push any test suite folder/files that we provide from the resources repo. When we grade your code, we will move a fresh copy of the hw1_tests folder into your repo, cd to that test folder, and run
cmake .
make grade
Your code must pass the tests to receive credit. You can essentially do this step yourself to ensure you pushed all the files and correct versions of those files by following the instructions below.
WAIT You aren’t done yet. Complete the last section below to ensure you’ve committed all your code.
Commit then Re-clone your Repository
Be sure to add, commit, and push your code in your hw1 directory to your assignment repository. Now double-check what you’ve committed, by following the directions below (failure to do so may result in point deductions):
- In your terminal,
cdto the top level folder (e.g.cs104-repos) that has yourresourcesandhw1-<your_reponame>repos, etc.
cd ~
cd cs104-repos  # or wherever you store your repos
- Create a subfolder called
verifyusing themkdircommand below and thencdinto that folder.
mkdir -p verify
cd verify
- Clone a new copy (of the latest contents that you pushed) of your assignment repo hw_username repo:
git clone git@github.com:usc-csci104-spring2026/hw1-<your_reponame>.git`
cd hw1-<your_reponame>
- Copy the test suite folder again into this new repo copy: `
cp -rf ../../resources/hw1_tests .
- Recompile and rerun your programs and tests to ensure that what you submitted works. You may need to copy over a test-suite folder from the
resourcesrepo, if one was provided.
cd hw1_tests
cmake .
make grade
And ensure all the tests pass (or the ones you expect to pass).
If there is a discrepancy, you likely did not add/commit/push your latest code. Go back to your cs104-repos/hw1-<your_username> repo/folder and figure out what did not get pushed, and rectify the situation.
Then, you can come back to cs104-repos/verify/hw1-<your_username>/hw1_tests and re-run make grade, repeating this process until it gives the expected results.