GCC and Makefiles
GCC (GNU Compiler Collection) is a program that we use to compile our program into executables. You have already used it in previous homeworks.
Make (GNU Make) is a program that makes other programs. This is especially useful when your programs become large, and recompiling after an edit requires multiple steps. Using a makefile, we can configure a program to compile simply by typing the make command into terminal. This lab will teach you how to write a basic makefile to be used in assignments from here on out.
1 - GCC
You might have noticed that we have been using some magic commands when we compile files. Namely, you should have seen g++, -g, -Wall, -o, and -c. Here is a brief explanation of what exactly these commands do.
First of all, g++ is used to compile your programs using the GNU Compiler Collection (GCC). The g++ command tells GCC that you want to compile a C++ program. There are other compilers out there, and when you want to use other compilers, you replace g++ with the command that’s used by the other compiler, such as clang++. In this class, we ask that you always compile your program with GCC using the g++ command, because that’s what we use when we grade you.
When you see a terminal command that has a - followed by some text, this is usually a flag (also called options). A flag can be used to specify a setting or add additional information about the command. An option may or may not take an argument. If an option takes in an argument, the argument is followed immediately after the flag. To use a flag, simply include it with your compile command.
In the g++ command, you will often see -g, -Wall, -o, -c, and -std= command. Here’s a description of what they do and how to use them:
-g: Provide debugging feature for your program. You will need this when you want to use gdb or valgrind. To use this flag, simply append the command to the end of your compile command.-Wall: Turn on all warnings. This is helpful because, as you might have seen, not all errors cause your program to not compile. There are some problematic operations that can cause undefined or unexpected behaviors in edge cases. By turning on all warnings, you make sure that you eliminate these potentially dangerous operations.-o: This flag controls the output name of your compilation. By default, the binary file name isa.out. When you append-o filenameto the end of your compile command, the compiled binary output will be the filename you specificed. Be carefule that the filename is not an existing file because you will overwrite the file.-c: Compile the files but do not link them. This is usually used to compile intermediate object files. We will explain this more in later parts of the lab.-std=<version>: This flag is used to specify the c++ version that you would like to use. As you expect, c++ is an evolving language, and it keeps adding new features to the language. Therefore, if you use a feature that’s introduced in a newer version but try to compile the code with an older version, the compiler wouldn’t know what the features are and the compilation will fail. You use this flag by appending this flag to the end of your compile comand and speficy the version number after the equal sign (i.e.-std=c++11). In this class, most of the times you can get away with using the default version and don’t need to include this command at all. There are times when you need to use the c++ 11 and you do it with-std=c++11.-fmax-errors=N: This tells the compiler to stop after encountering N errors in your code. Usually we don’t use it, because we want to see all errors in a code, and fix them together. However, at times you will find that some error messages are long and there are so many of them that you can’t see the top one (and if you are not fixing your compile errors starting with the first one, you should start doing that). This is when it becomes handy to stop compilation after some number of errors.-Wfatal-errors: This is similar to the previous one, except that the compiler will treat an error as fatal and stop on first error.
Lastly, you might sometimes see people compile files with g++ something.cpp main.cpp -o main -g -Wall, and you might wonder why they list the source files before the options. As it turns out, the order that you specify the options does not matter. If you really want to, you can even use g++ something.cpp -g -Wall main.cpp -o main to compile your program. However, by convention, we usually group the list of source files together and the list of options together.
Lets compile the sample code.
In the part 1 folder, you will find a file called charizard.cpp. You can compile this simply with the following instruction:
g++ -g -Wall -std=c++11 charizard.cpp -o charizard
2 - Using make
GCC is nice to compile our programs, but it gets annoying if we have to type a 20 character command 10 times during development. This is when a makefile comes in handy.
When you type make into terminal, Make will look for a file named makefile or Makefile for instructions. Let’s start with a makefile for a single cpp file.
2.1 - The Basic Makefile
A basic makefile’s structure is the following:
target: dependencies
    command_1
    command_2
    ...
    command_N
Each of these is called a rule. A target is a file that Make tries to create, commands are used to create the target, and dependencies are the files that determine whether the commands need to be executed. When you type make <target>, the make tool searches for the appropriate target in the directory and checks whether any of its dependencies need to be rebuilt. If the file is not found, or if any of its dependencies is newer than the target file, all commands in the rule will be executed.
In this instance, we want to create a charizard executable using g++ -g -Wall charizard.cpp -o charizard, and we need to recompile the file if charizard.cpp changes. Therefore, our rule should look like this:
charizard: charizard.cpp
    g++ -g -Wall charizard.cpp -o charizard
Note that the system command is and must be preceded by a tab. If you ever get an error message like this:
makefile:2: *** missing separator. Stop.
It means on line 2, make is expecting a tab but didn’t find it.
2.2 - Default Target
What happens when you just run make? Good question! By default, make will execute the first target in a makefile. By convention, we add a target called all and list targets we wish to build on make command after all.
Let’s have ‘all’ make the charizard file, which will become the name of our target. Our resulting makefile is as below:
all: charizard

charizard: charizard.cpp
    g++ -g -Wall charizard.cpp -o charizard
Save this file as Makefile in the part1 directory and type make. ~*~ MAGIC ~*~
Note: If you copy and paste the code template above you might get errors complaining about missing seperators. Try replacing space indents with tabs!
3 - Compiling Multi-File Programs
3.1 - Object Files
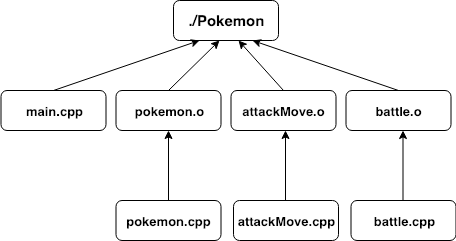
Compiling a multi-file program requires two main steps: compiling each .cpp file separately, and putting them all together to form the executable. The first step is know as compilation, during which the compiler checks for syntax and semantic mistakes, such as missing semicolons, calling a function that’s not declared, or returning the wrong type in a function. The second step is known as linking, during which the linker “links” your function calls - it finds the where the body of a function is so that it knows what line to execute when you call that function.
When you compile a program with g++ -g -Wall charizard.cpp -o charizard, you are actually compiling and linking it. It turns out that it’s possible to do them separately. This comes in handy when you have multiple files in your project. When you change one of the files, you can re-compile only files that depend on the change, and run linker, without having to re-compile the entire project.
In order to do that, we introduce a new binary file type: .o files, or object files. These are the intermediate files we make in preparation to compile the executable. Any file that doesn’t contain the main function must be compiled into a .o file. This is because the linker will expect to find the main function and use it as an entry point of your program.
Let’s look inside the part 2 folder.
$ cd ../part2
$ ls *
You will find three classes: AttackMove, Battle, and Pokemon. These files will combine into one final executable. We want to compile each of these into their own .o file of the same name.
To make an object file, we simply need to add the -c flag in the compile command, which tells g++ to not run linker. Let’s compile AttackMove first.
g++ -g -Wall -c attackMove.cpp -o attackMove.o
Simple as that. Do the same for the other two classes, and we can then compile the main.
g++ -g -Wall -c battle.cpp -o battle.o
g++ -g -Wall -c attackMove.cpp -o attackMove.o
g++ -g -Wall -c pokemon.cpp -o pokemon.o
3.2 - Putting It All Together
To compile the main, we just have to include all the .o files that we’ve already made in the g++ command.
g++ -g -Wall attackMove.o battle.o pokemon.o main.cpp -o pokemon
Note: A .o file is compiled code that doesn’t get linked to other code even if it calls functions from other classes. We tell the compiler this using the -c flag so that the compiler does not check whether the functions from other classes are implemented. When we want to compile the full executable, we do not want to have the -c flag in that statement because we want the compiler to link all the code together in the final step.
And you have your own pokemon battle simulator! Run it like normal using:
./pokemon
3.3 - Cleaning Up
Now we know how to generate .o files, and we know how to combine them into an executable. Great - but there’s a problem. We just generated like a million files! What if we want to clean up our directory to just source code? Having to delete a ton of files manually every time we want to build from scratch would defeat the purpose of this whole makefile thing!
Luckily, makefile targets allow us to run any kind of command we want, not just g++! It’s best practice always to include a ‘clean’ target that we can use to delete all of the .o files we dont need, along with our executables. Wildcard characters * are especially useful here.
clean:
    rm -f *.o <executable1, executable2...>
3.4 - Makefile Dependencies
Well that’s great and all, but how do we do that in a makefile?
Let’s go back to the basic make rule structure:
target: dependencies
    command_1
    command_2
    ...
    command_N
We skipped dependencies before, but it’s something we want to use now. If a target has dependencies, make first checks if those dependencies exist before executing the system command associated with that rule. If the dependencies don’t exist, make will run the rule to make those dependencies if they exist.
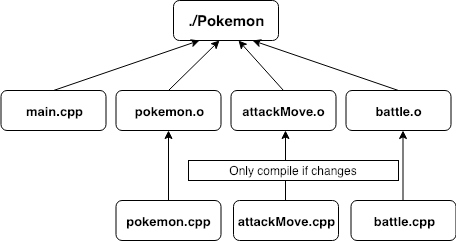
Make will also check to see if the dependencies have been updated since the last make and will only recompile the dependencies that have changed. This can save you a lot of time if you make a change and don’t want to recompile all the files in your project.
Remember that dependencies are the files that can affect the compilation result of your target. This includes all the non-standard-library files that you #include, a class’s own header file and .cpp file, and, if you are compiling into an executable, all the .o files you need.
A multi-file program might have a Makefile like this:
all: pokemon

pokemon: main.cpp attackMove.o battle.o pokemon.o
    g++ -g -Wall main.cpp attackMove.o battle.o pokemon.o -o pokemon

attackMove.o: attackMove.h attackMove.cpp
    g++ -g -Wall -c attackMove.cpp -o attackMove.o

<???>: <???>
    <???>

<???>: <???>
    <???>

clean:
    rm pokemon
    rm *.o
If you run make, this will fail. You will be filling in all the <???> at the end of the lab.
Note: If you copy and paste the code template above you might get errors complaining about missing seperators. Try replacing space indents with tabs!
4 - Assignment: Complete the Makefile
Your assignment is to complete the Makefile to compile pokemon. Fill in the Makefile!
BONUS Write the makefile using a File Structure or Variables as described below.
4.1 - Review Questions
- What is the purpose of the
-cflag? - What is the advantage of compiling to .o files via makefile compared to compiling the executable together in one step?
- What files should be in a rule’s dependency list?
Extra Information
Although out of the scope of this class, the below is extra information about Makefiles that may be helpful as you move forward.
5 - More about Makefiles
5.1 - File Structure
An issue that you may see is that by doing compilation with a Makefile, your folder gets really cluttered with the .o, .cpp, and .h files. To solve this you can create different directories within the folder to contain each type.
- A
includefolder is usually used to hold.hfiles, the files you include - A
srcfolder is usually used to hold.cppfiles, which contain the source code of the project - A
binfolder is usually used to hold compiled code like.ofiles or completed binaries
So you make this structure and then change the Makefile to find the files based off of a local path from the Makefile.
If your structure looks like this:
part2
    Makefile
    bin
    src
        main.cpp
        battle.cpp
        attackMove.cpp
        pokemon.cpp
    include
        battle.h
        attackMove.h
        pokemon.h
You would modify your Makefile as such:
bin/pokemon: src/main.cpp bin/attackMove.o bin/battle.o bin/pokemon.o
    g++ -g -Wall -std=c++11 src/main.cpp bin/attackMove.o bin/battle.o bin/pokemon.o -o pokemon
Also because you are changing the layout of the code, you will have to change the #include of each file to match this change. For example
#include "attackMove.h"
#include "pokemon.h"
#include "battle.h"
Needs to get changed to:
#include "lib/attackMove.h"
#include "lib/pokemon.h"
#include "lib/battle.h"
However, you can use a different compile flag -Ilib to prevent this. Technically, this is not a makefile feature, but a compiler option. However, you don’t normally group files into different directories unless your have a bigger project, in which case you should be using a Makefile (or IDE) to manage compilation.
5.2 - Variables
Makefile variables can be used to improve modularity and lessen the load on the writer. For example, you may have written g++ -g -Wall for all the commands for each file. Shouldn’t there be a way for you to type that once and use it over and over again? Like a variable?
Makefiles have this capability. You first need to define the variable at the top of the Makefile:
CXX = g++
CPPFLAGS = -Wall -g
In this case we defined two variables, one for the compiler we are using and the other for the flags we need. You can then use these variables throughout the Makefile
pokemon: main.cpp attackMove.o battle.o pokemon.o
    $(CXX) $(CPPFLAGS) main.cpp attackMove.o battle.o pokemon.o -o pokemon
You could also use variables to determine which folders you are using to hold your code.
5.2 - Integrate with GTests
In order to compile a GTest file, there is a long list of compile flags that you need to use. This is why we add those flags to the CPPFLAGS variable when we want to compile.
Take a look at the linked list Makefile from a previous lab. These are the variables:
CC = g++
CPPFLAGS = -g -Wall -std=c++11
BIN_DIR = bin
TEST_DIR = tests
GTEST_LL = -I /usr/include/gtest/ -l gtest -l gtest_main -pthread
And compiling a test is as such:
$(BIN_DIR)/DestructorTest: $(BIN_DIR)/DestructorTest.o $(BIN_DIR)/LinkedList.o
	$(CC) $(CPPFLAGS) $^ $(GTEST_LL) -o $@
5.3 - Extra Material
If you would like to know more about Makefile, you can visit GNU Make Manual. It covers both the basic and more advanced topics of the Makefiles.
CAUTION Do not use these advanced make commands until you are very comfortable with Makefiles.
6 - More about GCC
We have listed some commonly used flags and options that you will see in this class. This is just a list of the common flags that you will use in this class. This is in no way comprehensive. If you see a flag that you do not understand, or if you are curious about other options, you can refer to this official document from GCC. Feel free to play around with the flags in your free time.
IMPORTANT We will be compiling your code with -g -Wall -std=c++11, so you must use the same options to check that your code compiles and produces no warnings.
Lab Submission
Submit appropriate screenshots or files at this form. If you are in the synchronous lab and show your work to a TA/CP, you do not have to submit to the form.
What to submit:
- Makefile from part1 folder
- Makefile from part2 folder
- a .txt file of your answers to the review questions in section 4.1 of this lab (file can be named whatever you want as long as it is a .txt file)