Week 4
Overview
See subfolder `Labs/Lab04/.
This lab has 5 parts regarding Tomasulo 3. In fact, we release all 8 parts (3 of which you will do next week). But for this week, you need only complete:
- FRL
- BPB
- SB
- SAB
- CFC
Prelab for all Tasks
Review the lectures slides in the shared folder pertaining to each component that you need to complete.
Overview and Structure of Various Parts
File Structure
All of the parts to the Tomasulo 3 labs are organized in a similar way.
- Source code that you need to complete is in the
src/des/<part-name>folder where<part-name>is one of the parts are you are to complete (e.g.frl,bpb, etc.). Comments in the source code indicate the coding tasks you need to perform - A completed testbench for each part is provided in the
src/tb/<part-name>folder and is usually namedtop-tb-<partname>.vhd. - Simulation via Questa/Modelsim should be performed in the appropriate
sim/<part-name>folder. In each, there is a.dofile that will perform all simulation of your design for various instruction streams that will exercise each component in potentially different ways. - Components that we provide freely and which you do NOT need to modify are given in
src/des/common - Compiled instruction streams to be loaded into the processor’s instruction memory are in the
src/tb/instruction_streamsfolder and can be viewed for reference (each file shows the assembly instructions it will run).
Signal Spy
To verify your design, testbench instantiates our full, golden processor design as well as your implementation of the component being tested. We then use the “signal spy” feature of Questa/Modelsim to feed the same input signals from inside our golden design to both our internal golden implementation as well as your design. We similarly take out the internal outputs from our golden implementation of that component and compare them to the outputs you produce in each cycle, looking for (and logging) mismatches. See the diagram below.
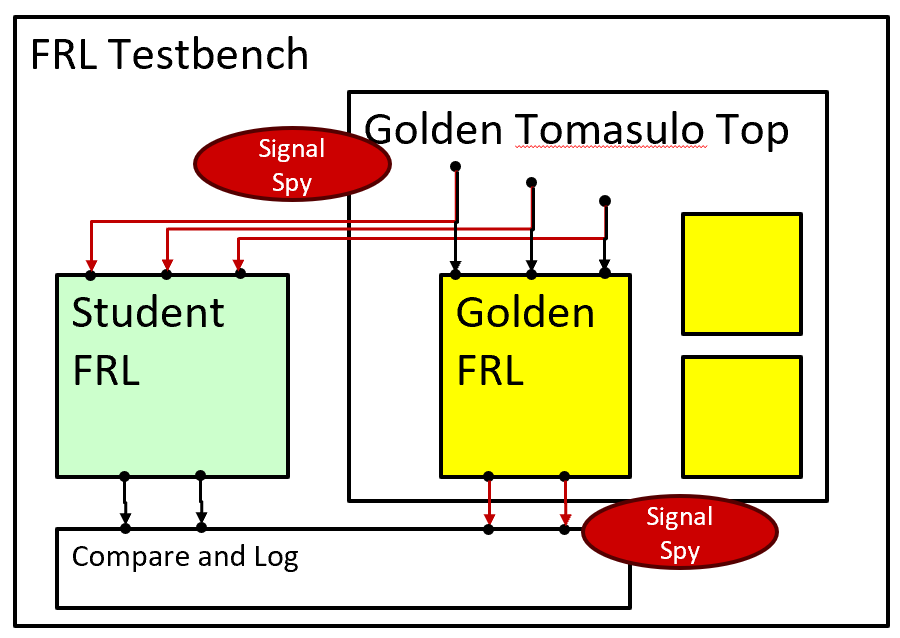
If all goes, well your outputs will match our golden results in each cycle and the logs will be empty. Your simulation folder will have two output files: TomasuloCompareTestLog.log and Tomasulo_do_file_log.txt.
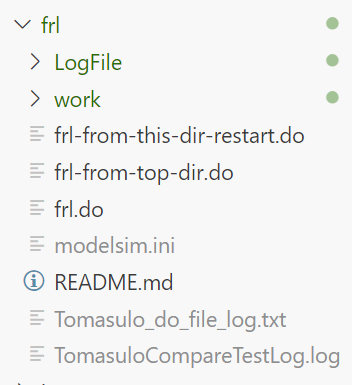
So after you follow the simulation steps described in detail below, you can look at the TomasuloCompareTestLog.log to ensure it is empty.

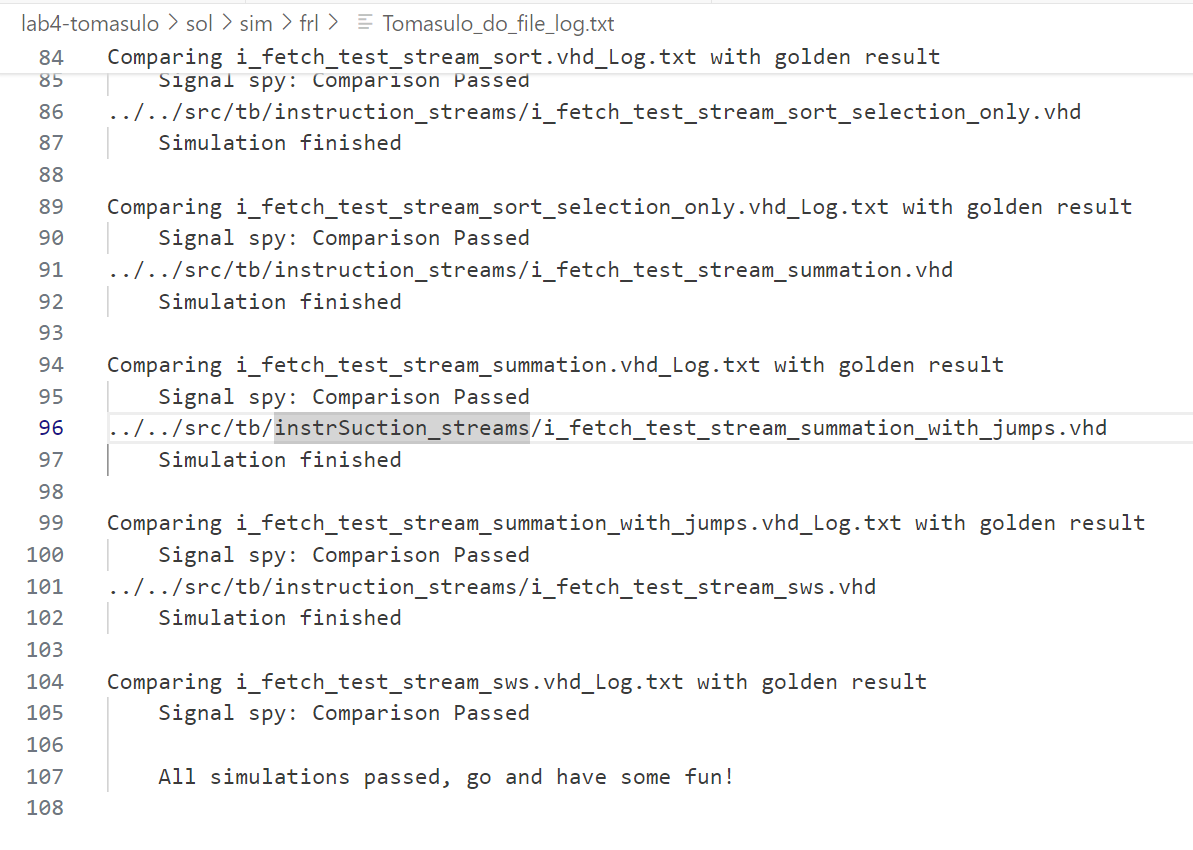
And, similarly, look at the Tomasulo_do_file_log.txt to see the results from each instruction stream that we use to test your implementation.
Simulation
So for each part described below, you will complete the various incomplete portions of the design code and then simulate it to ensure it matches our expected, golden design. To perform the simulation of a given part (we will use the free register list, frl, as an example), follow the steps outlined below.
- Open Questa/Modelsim
- You do not need to make a new project but simply use the
File..Change Directorymenu option to open thesim/<part-name>(e.g.sim/frl) folder wherever it is on your file system. - Run the simulation by simply typing the command
do <part-name>.do(e.g.do frl.do) at the Questasim prompt. It will run the full set of instruction streams (over 20) one at a time, which could take a few minutes. The simulation will produce a summary listing the results of each instruction stream in the same folder namedTomasulo_do_file_log.txt. Open it and see if there are mismatches or whether all instruction streams passed. (Note: If all streams passed a message at the bottom of the file will tell you to go celebrate!). If all passed, you are done. Move on to the next part. - If you had mismatches, then you can look at the file
TomasuloCompareTestLog.logfor the mistmatches of the LAST stream run. This may not be helpful since it is only the last stream, so at this point use the infor fromTomasulo_do_file_log.txtto pick a stream to debug, and then modify thefrl.dofile as described below.- Around one-third of the way into the
.dofile you will find aforloop iterating through all the instruction streams. Copy that for loop to another file or document as a backup (to restore it later). Then change theforloop to have just the one instruction stream you want to debug. For example, change the lines to:foreach item {i_fetch_test_stream_add.vhd }{, all on 1 LINE and ensure you keep the open brace{for the body of the for loop. - Add the command
pausebefore thequit -simline at the end of the.dofile to ensure you have time to inspect the waveforms, etc. (Note: When you run the.dofile and hit apausestatement, just typeresumeto continue execution). - Then rerun the
.dofile (e.g.do frl.do) to run the specific instruction streams and view waveforms, etc. after it finishes and debug your design. - More advanced users may consider simulating multiple streams at once by updating the
for loopto have a subset of the list, ensuring the syntax is correct. (Note: Commenting out#lines in the middle of the list of streams in theforloop doesn’t work as cleanly, so it’s best to just delete the lines you don’t want, which is why we had you make a copy in another document so you can easily restore it later). You can add apausecommand at the end for theforloop’s body to see the simulation results before going on to the next stream. - Once you believe your code works, paste back the full instruction stream list to the for loop, remove any
pausecommands, and rerun as described above.
- Around one-third of the way into the
Other Notes
- If an error occurs when running during a simulation, you can try to fix it and rerun the
.dofile, but if get a message that theTomasuloCompareTestLog.logor other file is open and cannot be deleted, you will need to EXIT Questa/Modelsim completely, and restart it and change directory back to the appropriate folder.
Part 1: FRL
Look in the frl subfolders in src/des/, src/tb, and sim for relevant files.
Procedure
There are 2 subtasks outlined the skeleton code that you need to complete. They involve completing the logic for reading and writing free registers from the FRL as well as updating the head and tail pointers and generating the output signals appropriately
Submission
- Online Submission: Copy over the following files to your SCF account
frl.vhd(fromsrc/des/frlfolder)names.txt
- Then run the following submission commands.
submit -user ee560 -tag t3-frl frl.vhd names.txt
Part 2: BPB
Look in the bpb subfolders in src/des/, src/tb, and sim for relevant files.
Procedure
There are 2 subtasks outlined the skeleton code that you need to complete. They involve accessing the appropriate 2-bit state for reading a predicition and updating/writing a prediction, and then writing the code to update the predictor’s state given an outcome from the CDB.
Submission
- Online Submission: Copy over the following files to your SCF account
bpb.vhd(fromsrc/des/bpbfolder)names.txt
- Then run the following submission commands.
submit -user ee560 -tag t3-bpb bpb.vhd names.txt
Part 3: SB
Look in the sb subfolders in src/des/, src/tb, and sim for relevant files.
Procedure
There are 3 small subtasks outlined the skeleton code as TODO. They involved updating the full and empty signals, how to generate the control signal to the SAB for when to flush a SW, and when to increment the trailing read pointer.
Submission
- Online Submission: Copy over the following files to your SCF account
sb.vhd(fromsrc/des/sbfolder)names.txt
- Then run the following submission commands.
submit -user ee560 -tag t3-sb sb.vhd names.txt
Part 4: SAB
Look in the sab subfolders in src/des/, src/tb, and sim for relevant files.
Procedure
There are 3 subtasks outlined the skeleton code. The first two are to generate a count of matches and “overall” match signal (is there at least 1 match) for entry 7 by patterning the code for the other entries. In Task 3, you will complete the code to compute the ROB depth of each entry in the SAB which will be used to selectively flush entries when a misprediction occurs. In Task 4, you’ll use the depths you computed to generate flush signals for each entry indicated who should be flushed on a misprediction. Your last task is to write the code to update an SAB entry when a SW graduates from the ROB to the SB and save the necessary information.
Submission
- Online Submission: Copy over the following files to your SCF account
sab.vhd(fromsrc/des/sabfolder)names.txt
- Then run the following submission commands.
submit -user ee560 -tag t3-sab sab.vhd names.txt
Part 5: CFC
Look in the cfc subfolders in src/des/, src/tb, and sim for relevant files.
Procedure
There are 7 subtasks (numbered 0 to 6) outlined the skeleton code. You will need to:
- Generate the full signal (indicating no more CFC checkpoints are available for any future branches or
jr $31instructions). - Update the appropriate DFA bit when a new, register writing instruction is dispatched.
- Update the head pointer and other bookkeeping info when a new checkpoint is created (i.e. when a branch or
jr $31instruction is dispatched). - Produce the appropriate outputs for the rs register
- Update the commited rs replica (i.e. RRAT replica for rs) when an instruction commits.
- Repeat the above two tasks for $rt
- Repeat the above two tasks for $rd
Submission
- Online Submission: Copy over the following files to your SCF account
cfc-bram.vhd(fromsrc/des/cfcfolder)names.txt
- Then run the following submission commands.
submit -user ee560 -tag t3-cfc cfc-bram.vhd names.txt
