C++ Setup Using Google Cloud Shell (VS Code-style Cloud Editor)
Note: This guide was create in part with the help of chatGPT, OpenAI (1/7/2026).
Audience: CS104 Students
Goal: Build, debug, and memory-check C++ programs using a browser-based Linux environment
Platform: Google Cloud Shell / Cloud Editor (free)
1. Open Google Cloud Shell Editor
- Go to https://ide.cloud.google.com
- Sign in with a Google account
- Click Open Editor (VS Code–style interface)
You now have:
- A Linux terminal
- A web-based VS Code editor
- A persistent home directory
2. Customize the Environment (1 Time setup)
Each time Cloud Shell restarts, it creates a new VM. While it saves your home directory and files it does not save the necessary compiler toolchain and other utilities. Thus, you must specify what utilities to install each time it starts by creating a file called:
.customize_environment
Create the file
In the Cloud Shell terminal at the bottom of the screen (click View..Terminal if you do not see a Terminal), run:
nano ~/.customize_environment
Paste in the following contents exactly (you may need to right-click in the terminal area).
echo "Sourcing CS104 tools"
sudo apt update
sudo apt install -y \
  cmake \
  valgrind \
  pkg-config \
  unzip \
  libgtest-dev

cd /usr/src/gtest
sudo cmake .
sudo make
sudo cp lib/*.a /usr/lib

cd $HOME
mkdir -p ~/.cloudshell
touch ~/.cloudshell/no-apt-get-warning

git config --global user.email "ttrojan@usc.edu"
git config --global user.name "Tommy Trojan"

git config --global color.ui auto
git config --global core.editor "nano"
git config --global init.defaultBranch main
git config --global core.autocrlf input
git config --global push.default simple

python3 -m pip install xmltodict
Using only your ARROW keys, backspace and delete, change ttrojan to your USC email username and change Tommy Trojan to your name.
Save and exit (Ctrl+o, Enter, Ctrl+x).
Make it executable
chmod +x ~/.customize_environment
Apply the customization
To apply the customization immediately, run:
source ~/.customize_environment
Alternatively, the file will be automatically sourced on your next Cloud Shell restart.
⚠️ This may take several minutes the first time. Type Y or hit Enter to answer any questions/prompts.
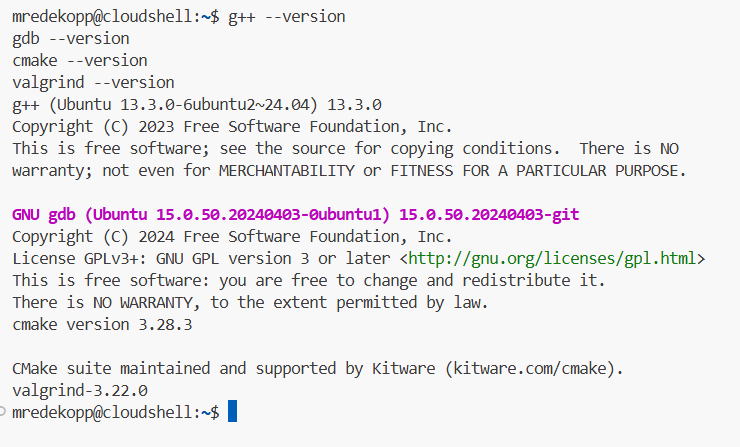
3. Verify Installed Tools
g++ --version
gdb --version
cmake --version
valgrind --version
4. CS104 folder and CMake Starter Project (Multi-file, In-Source Build)
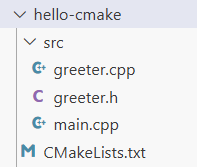
Here is the final folder structure and files you will now create:
Folder Structure
cs104-repos/
└──hello-cmake/
   ├── CMakeLists.txt
   ├── .vscode/
   │   └── launch.json
   └── src/
      ├── main.cpp
      ├── greeter.cpp
      └── greeter.h
We recommend making a cs104 or cs104-repos (you can name it what you like, but avoid spaces in the name) folder under your HOME folder.
To do so, use these commands at the prompt.
cd $HOME
mkdir cs104-repos
cd cs104-repos
Important Note: *Each time you want to clone a new repo or work on your coding homeworks or labs, you can navigate to the appropriate repo folder by starting a terminal and using the command
cd ~/cs104-repos/<repo_name>.
Now you’ll create the folders needed for the test example, hello-cmake. Enter the commands:
Create the test folders:
mkdir -p hello-cmake/src hello-cmake/.vscode
cd hello-cmake
Create the necessary files in the specified folders. Ensure you click on the appropriate folder before creating a new file in VSCode. The button to create a new file looks like:

CMakeLists.txt
cmake_minimum_required(VERSION 3.16)
project(hello LANGUAGES CXX)

set(CMAKE_CXX_STANDARD 17)
set(CMAKE_CXX_STANDARD_REQUIRED ON)

add_executable(hello
    src/main.cpp
    src/greeter.cpp
)
src/greeter.h
#pragma once
#include <string>

std::string make_greeting(const std::string& name);
src/greeter.cpp
#include "greeter.h"
using namespace std;

string make_greeting(const string& name) {
    return "Hello, " + name + " from CMake + WSL!";
}
src/main.cpp
#include <iostream>
#include <string>
#include "greeter.h"
using namespace std;

int main(int argc, char* argv[]) {
    if (argc < 2) {
        cout << "Usage: " << argv[0] << " <name>" << endl;
        return 1;
    }

    string name = argv[1];
    cout << make_greeting(name) << endl;
    return 0;
}
After creating these files you folder structure should look like this:
Known Issue
Sadly, GCloud’s IDE erroneously shows the Intellisense red-squiggle “errors” for things that are not errors. But, there does seem to be a fix.
In the terminal, go to your HOME folder:
cd ~
Then at the terminal, paste in this command (which just creates a settings file named .clangd with certain compiler options/flags to help the GCloud editor find the libraries and other built-in C++ features.
cat > .clangd <<'EOF'
CompileFlags:
  Compiler: g++
  Add:
    - -std=c++17
    - -I/usr/include/c++/13
    - -I/usr/include/x86_64-linux-gnu/c++/13
    - -I/usr/include/c++/13/backward
    - -I/usr/lib/gcc/x86_64-linux-gnu/13/include
    - -I/usr/local/include
    - -I/usr/include/x86_64-linux-gnu
    - -I/usr/include
EOF
Then, reload the window (or close and reopen Cloud Shell. Hopefully, these warnings would disappear.
If that does not work, let your compiler be the truth, meaning compile your code (with g++) to find errors and, for now, ignore the red squiggles.
5. Build and Run (In-Source)
Ensure you are back in your hello-cmake folder:
cd cs104-repos/hello-cmake
At the terminal in the lower pane (you may need to click View..Terminal)
cmake .
make
./hello Alice
You should see the program run and greet Alice!
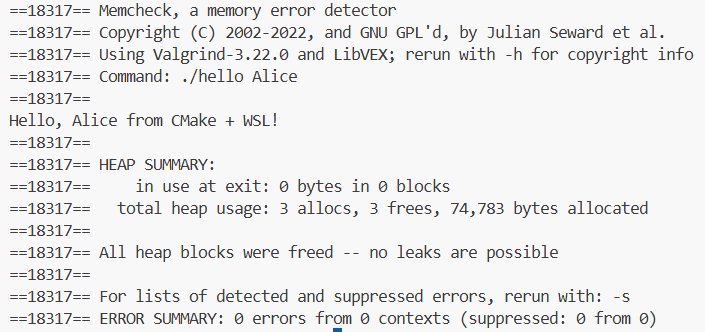
6. Valgrind (Memory Checking)
Now run with valgrind. You should see the same output as before but with the additional Valgrind banner and debug output.
valgrind --tool=memcheck ./hello Alice
7. Debugging with Cloud Editor (VS Code GUI)
To use the integrated debugging GUI front end of VSCode is most easily accomplished with a launch.json file in a .vscode subfolder. For VSCode to automatically find and use this configuration file, you must point VSCode to the top-level project folder where the .vscode subfolder resides. Regardless of where your terminal indicates it is, VSCode must be opened to the specific project folder.
So, choose File..Open Folder and choose the hello-cmake folder your downloaded and click OK.
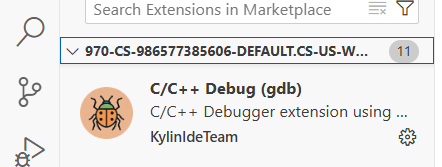
- Open the Extensions view (Ctrl+Shift+X)
- Search for “C/C++ Debug (gdb)” or simply “C/C++ Debugger”
- Install the extension authored by KylinIDETeam (or any C/C++ GDB extension available in the marketplace)
- Reload the editor when prompted
Note: Cloud Shell Editor’s extension marketplace is limited compared to desktop VS Code; if you cannot install an extension there, use the terminal-based gdb workflow (see Troubleshooting below) or consider setting up a native C++ compiler toolchain on your laptop.
Create .vscode/launch.json by first running these commands at the terminal (assuming your are in your hello-cmake folder at the terminal):
touch .vscode/launch.json
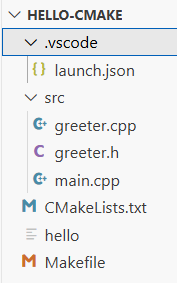
Your file tree should now look like:
Then open the launch.json in the editor and paste in these contents and save the file.
{
  "version": "0.2.0",
  "configurations": [
    {
      "name": "Debug hello (gdb)",
      "type": "cppdbg",
      "request": "launch",
      "program": "${workspaceFolder}/hello",
      "args": ["Alice"],
      "stopAtEntry": false,
      "cwd": "${workspaceFolder}",
      "environment": [],
      "externalConsole": false,
      "MIMode": "gdb",
      "setupCommands": [
        {
          "description": "Enable pretty-printing",
          "text": "-enable-pretty-printing",
          "ignoreFailures": true
        }
      ]
    }
  ]
}
Debug Steps
- Open
main.cpp - Click left of a line number to set a breakpoint
- Press Run..Start Debugging
8. Summary and Reminders
- Your home directory persists, but the VM may reset
- Rerun the following commands if tools are missing
cd $HOME
source ~/.customize_environment
- This environment should match our autograder’s exactly
You can now develop, debug, and memory-check C++ programs entirely in your browser.