Introduction to Git
Git is a distributed source code version control system. When you place your code under version control, you record the changes you make to your files over time and you can recall the history of each of your file changes at will. We will be using git extensively this semester in homework assignments.
GitHub is a development ecosystem based around git. In this course, we will be using GitHub to host our git repositories and we will take advantage of other GitHub features such as the issue tracker and wiki.
If you have not done Lab 0 to set up your GitHub account or install course VM/Docker, please do it now. Please make sure that you set your USC email as the primary and public email address for your GitHub account. Otherwise you will not be able to submit your homework.
0 - Tutorial and Disclaimer
While the following lab will orient you to using git we recommend watching the following video and the reviewing the related slides before starting your HW1.
Also, the instructions and discussion in this lab are for the git command line interface in course VM, Git Bash on Windows, or your Mac Terminal. GitHub and other software vendors have GUI-based applications to interact with repository. These tools are not supported in this class, so use them at your own discretion.
1 - Using Git
In Lab 0, you configured your git settings and Github account. Now that all your settings are in place, you are (finally) ready to use Git!
1.1 - GitHub Repositories
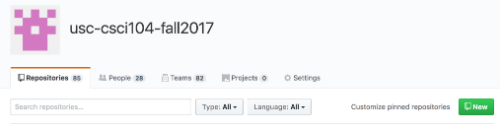
You will need to be added to the usc-csci103 in order to access all course-related repositories. To check whether you have access, open the organization page.
If you see a list of repositories, then you have joined the organization already and you may continue to Section 1.2.
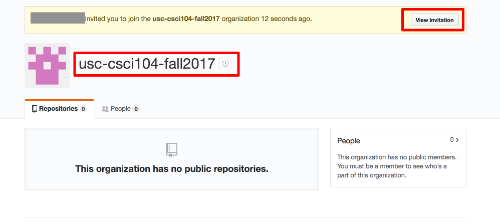
If you are prompted with a message that you’ve been invited to join the usc-csci103 organization, go on to View Invitation:
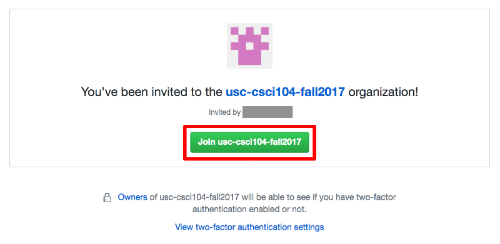
You should be taken the organization’s invitation page and click on Join usc-csci103:
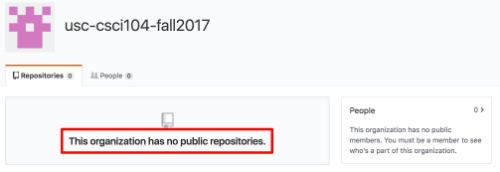
If you see something like this, then you are not added to the organization yet. Contact a TA/CP about how to get added to the course organization:
A repository is a place to host your code. You can think of it as a directory or folder in a cloud server (i.e. GitHub server). Just like a folder in your Google Drive or Dropbox, a repository can contain sub-directories and files. Unlike cloud drives, changes to your local copy of the repository are not automatically synced to GitHub servers (and for good reasons).
In this class, we will create repositories in our PRIVATE organization account and give you access to your own personal repository, name hw-username (where username is your USC username) and some shared repositories for common resources (for homeworks and labs).
1.2 - Clone Your Repository
At this stage, we created a repository to host our code called a code. We now need to make a local version of the repository to work with it. The is called cloning the repository. To do that, you need to get the cloning URL by visiting the page of the repository you just created in GitHub and look for the SSH clone URL.
-
Go to our class organization page and try to locate your personal repository
hw-username. If you cannot find it, please alert the course staff as we will likely need to create it because you have not performed the necessary setup yet. -
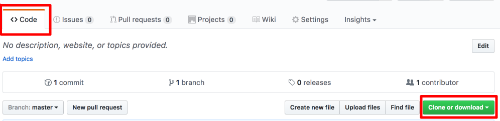
Go to your repository page and look for the green Clone or download button.
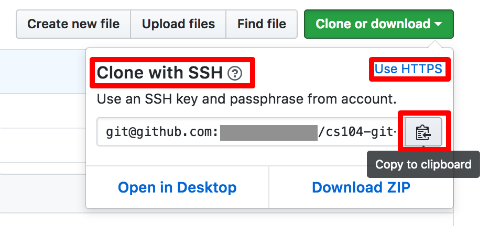
- Click on Clone or download and select Clone with SSH. Click on the button to the right of your repository url to Copy to clipboard. You can use the botton at the top right to toggle between Use HTTPS and Use SSH.
- If you are on the VM, open a terminal OR, if using Docker, just use your Mac terminal or Git Bash Terminal on Windows. Navigate to whatever folder you’ve chosen to mount for Docker (i.e. where you want to put your repository folders) using appropriate
cdcommands. Using the URL copied above, you can clone the repo by typinggit cloneand pasting the copied URL. It should result in a command that looks like:
# Clone the repository. Replace the url with what you copied from GitHub in the previous step.
git clone git@github.com:usc-csci103/hw-username.git
If prompted with the following question, type yes and press Enter.
The authenticity of host 'github.com (192.30.255.112)' can't be established.
RSA key fingerprint is SHA256:nThbg6kXUpJWGl7E1IGOCspRomTxdCARLviKw6E5SY8.
Are you sure you want to continue connecting (yes/no)?
You should see something like this when git is done cloning:
remote: Counting objects: 4, done.
remote: Compressing objects: 100% (3/3), done.
remote: Total 4 (delta 0), reused 0 (delta 0), pack-reused 0
Receiving objects: 100% (4/4), done.
Checking connectivity... done.
Now you have clone the repository to your local machine, you can start working in it.
# Start working in the repository
cd hw-username
Enter the pwd command to ensure you are in your hw-username folder:
pwd
/home/redekopp/cs104/su20/hw-redekopp
Ensure the path above ends with your hw-username folder.
1.3 - HelloWorld.cpp
Create a subfolder in your hw-username folder named lab1 and enter that directory.
mkdir lab1
cd lab1
Use your favorite editor to write a HelloWorld program in a file called lab1.cpp (BE SURE IT IS NAMED lab1.cpp):
# include <iostream>

int main()
{
  std::cout << "Hello!" << std::endl;
}
Check the Repository Status
Since we have made progress in our code, it is a good idea to commit that code to the repository and make part of our code history. To see what files changed, you run the following command:
git status
You will get something like:
On branch master
Your branch is up-to-date with 'origin/master'.

Untracked files:
  (use "git add <file>..." to include in what will be committed)

        lab1.cpp

nothing added to commit but untracked files present (use "git add" to track)
In the above status message, git is telling you that you have one file that is not currently tracked by your repository and that file is called lab1.cpp. If you want to add the file to your repository, you need to use the git add <file> command. Here is an explanation of the some of the terms:
- branch master: you are currently working on the main thread of developement that is called by default: master.
- origin/master: in this context, origin/master refers to the master on GitHub.
- Your branch is up-to-date with ‘origin/master’: your local repository is sync-ed with the GitHub server. (Hint: this is since the last time you received an update from the server, which may or may not be the server’s latest state).
- Untracked files: files that are not part of the repository and were never added to the repository before.
1.4 - Commiting Changes
To track lab1.cpp, we use the following command:
# Add lab1.cpp
git add lab1.cpp
Now, let’s check the status of our repository:
git status
You notice we get:
On branch master
Your branch is up-to-date with 'origin/master'.

Changes to be committed:
  (use "git reset HEAD <file>..." to unstage)

        new file:   lab1.cpp
This tells us that we just added a new file called lab1.cpp and we are ready to commit. Technically, we moved this new file from being untracked to be staged for commit. You can continue working on other files and you can stage them too. Once you feel that you are ready to committed, i.e. be part of the repository history, you use the following command:
# Commit with a message
git commit -m "My first lab1 using git"
This will commit lab1.cpp and make it part of repository history. Each commit must have a message associated with it. You can add the message as part of the commit command using the -m option (see code above) or git will prompt you for a message using the editor you configured in section 3.
To check the commit history for the repository, you use the log command:
# See the commit history of the repository
git log
Which will give us the following message
commit df7cd3feda8a856de9cb2dc4bc132f15f7842bb1
Author: Tommy Trojan <ttrojan@usc.edu>
Date:   Tue Jan 14 17:42:52 2014 -0800

    My first lab1 using git

commit 6d9fe80012ff9bf5b43120a87dc61bf196fec313
Author: Tommy Trojan <ttrojan@usc.edu>
Date:   Tue Jan 14 15:57:08 2014 -0800

    Initial commit
The commit history of this repository shows that we have two commits in reverse chronological order. For each commit, you see the commit id (which is a SHA1 checksum), the author, the time the commit was made and the commit message.
1.5 - Pushing to Remote
Now that we committed successfully, let’s check the status of our repository
# Check status of repository
git status
You will notice something different about this message:
On branch master
Your branch is ahead of 'origin/master' by 1 commit.
  (use "git push" to publish your local commits)

nothing to commit, working directory clean
It says that we are: ahead of ‘origin/master’ by 1 commit. If you go back to your repository page in GitHub, you will find that it only has one commit as opposed to the two you have locally. Since git is distributed, it allows you to work “offline” by committing locally and only pushing to the server once you feel ready to do so.
[Hint] Commit often and commit early. Try to push to the server as soon as you have a good portion of your code complete so you have a backup of your code. Never leave your coding session before pushing to the server.
To push your changes to the server, you use the following command
# Push changes to remote
git push
Now, check the commits section of your code repository by clicking on the commits links in your repository’s page

1.6 - Pulling from Remote
Since git uses the distributed model, you can have multiple copies of the repository on multiple machines. This makes it important to make sure your local version is up to date. Here is a practical example of what could happen.
- Go to your repository on GitHub
- Click on the
lab1.cppfile - Click on Edit to edit the file online
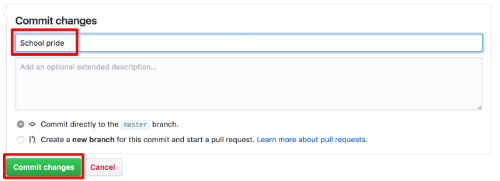
- Let’s update
lab1.cpp: + ChangeHello!toHello World!+ In Commit changes type:whole world - Click Commit changes`
Visit the commits page in your repository and note how many commits you have. Now, go to your local repository and check the status of your repository:
# Check status of repository
git status
You should get
On branch master
nothing to commit, working directory clean
If you check the commit history, how many commits will you see:
# Produce commit history with one line per commit
git log --pretty=oneline
Notice that despite that you have 3 commits in total, you can only see 2 on your local machine. Because git compares your local repository to the remote repository using the lastest update from the server, it may or may not be the server’s latest state.
To get an update from the server and bring your local repository up to date, you need to pull from the server:
# Get the latest updates
git pull
You will get a response that looks like:
remote: Counting objects: 3, done.
remote: Compressing objects: 100% (3/3), done.
remote: Total 3 (delta 0), reused 0 (delta 0), pack-reused 0
Unpacking objects: 100% (3/3), done.
From github.com:TTrojan/cs104-git-practice
   df7cd3f..1ffe7e8  master     -> origin/master
Updating df7cd3f..1ffe7e8
Fast-forward
 lab1.cpp | 2 +-
 1 file changed, 1 insertion(+), 1 deletion(-)
Here, git is telling you:
- It is updating from git@github.com:hw-ttrojan/lab1.git
- It updated master
- The update was from commit
df7cd3fto commit1ffe7e8lab1.cpphas two changes - one insertion and one deletion.- There was one file changed
- There was one line inserted
- There was one line deleted
If you want to see in detail what the changes in the last commit were, you issue this command:
git log -p -1
To see
commit 1ffe7e8b5e776395126fb6e06fc72f5af12ab063
Author: Tommy Trojan <ttrojan@usc.edu>
Date:   Tue Jan 14 18:53:08 2014 -0800

    School pride

diff --git a/lab1.cpp b/lab1.cpp
index 55818b8..b9a284d 100644
--- a/lab1.cpp
+++ b/lab1.cpp
@@ -1,5 +1,5 @@
 #include <iostream>

 int main() {
-       std::cout << "Hello!" << std::endl;
+       std::cout << "Hello World!" << std::endl;
 }
Type q if you are not back at the prompt (stucky displaying the log).
1.7 - Ignoring Files
Code repositories are intended for just that, code. When working on a programming project, you may get a number of different files such as: object files, executables, log files and sometimes compiled header or library files. It is important to keep your repository clean of such unecessery files.
git uses a file named .gitignore to list all files or file extensions that git should not track or report when you do a git status. Your repository now has a list that was auto generated by GitHub. You can see that list by typing the following command from within your repository:
# List the contents of .gitignore
cat .gitignore
Let’s compile our lab1.cpp to get the executable lab1:
# Compile lab1.cpp
g++ -g -Wall lab1.cpp -o lab1
# Run the executable
./lab1
Now, if we do a git status, we will get the following output:
On branch master
Untracked files:
  (use "git add <file>..." to include in what will be committed)

        lab1

nothing added to commit but untracked files present (use "git add" to track)
Since lab1 is an executable, we don’t want to add it to the repository and we definitly don’t want git status to keep bugging us about it. Append lab1 to .gitignore.
Now, do a git status and examine the output:
On branch master
Changes not staged for commit:
  (use "git add <file>..." to update what will be committed)
  (use "git checkout -- <file>..." to discard changes in working directory)

        modified:   .gitignore

no changes added to commit (use "git add" and/or "git commit -a")
As you can see, we are no longer prompted for lab1. However, we now need to commit our changes to .gitignore.
# Add .gitignore after modifying it
git add .gitignore

# Commit the changes
git commit -m "added lab1 to the list of ignored files"

# Pushing the changes to the server
git push
[IMPORTANT] When you turn in your homework through GitHub, you should not add any binary files to your repository. This includes executables and object files (more on this later in the class). You will lose points for turning in these files. As a general rule of thumb, anything that you write should be included and anything that we can generate by running compiling commands should be excluded.
1.8 - Practice the HW submission Process
To submit your homeworks you will push your code to Github and then register/submit the SHA of that ‘commit’ on our course website. First, get the full SHA digest number of your latest commit:
# Print out the commit history and find the SHA
git log

commit 299a5948365e15cafe2cb461f552f7a0f020ac69 (HEAD -> master, origin/master)
Author: Tommy Trojan <ttrojan@usc.edu>
Date:   Tue May 19 08:45:04 2020 -0700

    added lab1 to the list of ignored files
Select and copy to the clipboard your full SHA of the commit you want us to grade (usually your latest) (e.g. 299a5948365e15cafe2cb461f552f7a0f020ac69 from above).
Next go to this submission site link
Paste in your SHA in the text box that requires it and click Submit via Github. A message will indicate if the submission was recorded AND if that submission had all the files we expected. Check for that message below: Submission Verified!! All required files exist!. We often have a set of files that are required. You may commit more files (especially files that we may not know the name of in advance) but your latest commit should at least have the files listed on the submission page.
If the website indicates that all expected files existed, now press Check My Submission which will pull your commit, attempt to compile the code and run a basic sanity check (though usually not the full suite of grading tests). Look at the output in the webpage below and read through its messages. Verify it passed all tests.
Each time you submit a homework, this will be the process.
- Add/commit/push your code to Github
- Find your full SHA (using
git logor by using the github website approach linked on our submission instructions page ). - Go to the submission page for the particular assignment (usually linked on our assignments page) and paste in your SHA.
- Click Submit via Github and verify the necessary files exist. If they do not, go back and add/commit/push those files and repeat this process.
- Then click Check My Submission and review the output. If there are errors, fix them and repeat this whole process.
1.9 - Clone the Resources Repo
The resources repository is where we post things related to your homework and labs. This includes any skeleton code, sample test cases, and grading rubrics (after grades are released). Starting from homework 1 and lab 2, you will need to use skeleton code from this repository to finish lab assignments. Each assignment will have a folder underneath this repository.
- Go to the folder where your
hw-usernamerepo folder is. Ensure you are not IN thathw-usernamefolder but at the same level where that exists. -
Clone the
resourcesrepo:git clone git@github.com:usc-csci103/resources.git - Ensure the repo was downloaded by reviewing the messages from the previous command. If you type
lsyou should seeresourcesas a subfolder alongside yourhw-usernamefolder.
1.10 - Let’s Git Going
To summarize, we learned the following git commands:
# Clone a repository
git clone git@github.com:usc-csci103/hw-ttrojan.git

# Add an untracked or modified file
git add <file1> <file2> <...>

# Remove a file from your git repository AND your local repository
git rm <file1> <file2> <...>

# Commit files that are staged for commit
git commit -m "non-optional commit message"

# Push commits to the server
git push

# Check the status of the repo
git status

# Let's make sure our repository is up to date
git pull

# See the commit history
git log

# See the commit history by printing a summary of each commit in a line
git log --pretty=oneline

# See the log of the last commit (-1) showing diffs of all the files (-p)
git log -p -1
When you are working on your homework, you should ALWAYS use git pull before you start. As you progress, you should sync your changes to the server often, using git add, git commit, and git push.
2 - Lab 1 Checkoff
Demonstrate to a TA/CP that you could submit your lab1.cpp on our website and show the output of clicking Submit via Github and Check My Submission.
For Summer 2021, please take a screenshot of the webpage indicating successful check after you clikced Check My Submission and submit on the form linked at the bottom of this page.
3 - Important Repositories
3.1 - Homework Repository
The private repository named hw-username you cloned in the previous section will be where you submit all your homework.
This will be your homework repository where you will be doing all your homework assignments. In order for us to grade you, all your work must be pushed to your homework repository.
3.2 - Resources (HW and Labs) Repository
The resources repository is where we post things related to your homework and labs. This includes any skeleton code, sample test cases, and grading rubrics (after grades are released). Starting from homework 1 and lab 2, you will need to use skeleton code from this repository to finish lab assignments. Each assignment will have a folder underneath this repository.
3.3 - Cannot access a course repository?
If you cannot access the orgnization page or you get an error (i.e. 404 This is not the web page you are not looking for) when trying to access all of the repository links, please make sure that you have set up your GitHub Accoutn correctly, following these steps.
If you can access some of the above links but not all of them, please let your lab instructor know. Give them your USC username, and the repositories that you cannot access.
If you joined the class late (i.e. missed first week of class/lab), or if you still cannot access your repository during the second week of class, please let your lab instructor know. Give them your USC username.
4 - Git Resources
For more on git and how to use it, see the following resources.
Video Tutorial by Prof. Redekopp
[CAUTION] Unless you are already familiar with Git, please avoid using any commands that you do not already know on course related repositories (i.e. labs, resources, and hw-username). You are welcome to create your own repository and test out Git’s various commands there.
Lab Submission
Submit appropriate screenshots or files at this form. If you are in the synchronous lab and show your work to a TA/CP, you do not have to submit to the form.