1/18
***
←
→
Even more Java
In this lecture, we look at:
- URL fetching
- reading a text file
- object creation
- arg parsing
- threads
- Java2D API
- 3D printing
URL fetching
From the start, Java was designed to be an Internet-friendly language, which means it has networking classes built into it.
Here is sample code that uses the java.net.URL class to fetch the raw contents of a given URL:
import java.io.BufferedReader;
import java.io.InputStreamReader;
import java.net.URL;
public class URLReader {
public static void main(String[] args) throws Exception {
URL myURL = new URL("http://www.usc.edu/");
BufferedReader in = new BufferedReader(new InputStreamReader(myURL.openStream()));
String inputLine;
while ((inputLine = in.readLine()) != null)
System.out.println(inputLine);
in.close();
}
}
The above program could serve as the basis for building a simple browser, web crawler, etc.
A couple of alternative ways (just FYI) are shown below [they are in this SO post, which also contains even more ways]:
String out = new Scanner(new URL("http://www.google.com").openStream(), "UTF-8").useDelimiter("\\A").next();
public static String readStringFromURL(String requestURL) throws IOException
{
    try (Scanner scanner = new Scanner(new URL(requestURL).openStream(),
            StandardCharsets.UTF_8.toString()))
    {
        scanner.useDelimiter("\\A");
        return scanner.hasNext() ? scanner.next() : "";
    }
}
Also FYI - the try(){} block above is called a 'try-with-resources' statement.
Reading a text file
The easiest way to open a text file and fetch its contents line by line is to use the FileReader and BufferedReader classes.
Here is an example that shows reading a text file:
import java.io.*;
class readFiles {
public static void main(String args[]) throws Exception {
FileReader fr = new FileReader("WeThePeople.txt");
BufferedReader br = new BufferedReader(fr);
String s;
while((s = br.readLine()) != null) {
System.out.println(s);
}
fr.close();
}
}
Object creation: Class.forName
There are 3 main ways of creating objects in Java:
1. using A a = new A(); // using 'new'
2. using Class.forName()
3. via cloning an existing object
Class.forName accepts a String input (the name of a class), and outputs a Class, ie. loads the specified class' .class file (if available). We can then use the Class class' .newInstance() method to create objects! This shows how.
Such a capability is useful for loading 'plugin' files, for example.
Object creation via .clone()
Given an object a of type A, simply creating b (also of type A) and ASSIGNING a to b will not create a copy of a inside b (it will simply point b to a):
A a = new A();
A b = a;
To create an INDEPENDENT copy of a, we need to 'clone' a, which means class A needs to implement the .clone() method from the 'Cloneable' interface. Then we can do a.clone() to create a copy of a to assign to b. In other words, the JVM has no knowledge of the internals of an object to be able to clone (copy) it; instead, the programmer needs to supply the cloning code via .clone().
A.java and objCloning.java demonstrate how this works.
Argument parsing (command line input)
So far, we have ignored String[] args in main(String[] args); it is there when a program needs to be passed inputs via a shell.
Each argument (input) is separated by spaces, and is refered to as args[0], args[1].. in order.
If args.length (argument count) is >0, we have arguments - that's how we'd check.
argParsing.java is a simple example showing how you can pass on a user-specified value into an object's method (eg. into a fractal constructor, we could pass in xres,yres that are specified by the user in the command line, ie. when the user runs the program - no need to hardcode and compile those values in).
When trying out the above example in drjava's console, be sure to do something like
java argParsing 10 "test"
instead of
run argParsing 10 "test"
Threads
Java supports threading, ie creating independent execution units, within your program. Like a physical thread, each execution thread has a beginning (start) and end (stop). To create threads, a program needs to either subclass Thread, or implement Runnable.
ThreadDemoV1.java is a simple demo of creating and starting threads.
Threads [cont'd]
ThreadDemoV2.java shows how to create threads by implementing the Runnable interface.
Note how we need to construct a Thread() before we .start() it. Also, note how we need to access the running thread via Thread.currentThread(). In the V1 version (where we subclassed Thread), we did not need to do either.
Which is a better approach? Depends. If we don't care about ever subclassing our class (and are not extending another class), we can simply subclass Thread. If we do need to subclass our class later (or are extending a class), we'd implement Runnable. Performance-wise, both ways are identical.
How do threads and cores (in a CPU) relate to each other? Here is a post that discusses this. And, what about GPUs? Here is a discussion.
Java2D API
The Java2D API provides a rich set of drawing primitives, transformations, etc.
This example shows how to create a shape as a series of paths, and how to transform it.
Java2D is useful for creating complex graphics (including animations), eg. to render this instrument panel:

Java2D API: image processing
The Java2D API offers a way to do image processing, using the ava.awt.image.BufferedImage class to represent an image, and the java.awt.image.BufferedImageOp interface to define processing operations. We define processing operations in filter() [which the interface specifies].
ImageDicer.java is a small but complete example that shows image processing operators are defined and executed.
If you look at the source, you can see that it is simple to create your own filters. I added one called 'Darken25' (darkens the image to 25%), just to show this capability - here is the altered source (feel free to add more!).
3D printing!
A 3D-printable file is usually in the .stl format, or .x3d(b). The STL (.stl) format is the simpler one, and looks like this:
solid
  facet normal 0 0 0
    outer loop
      vertex  0.0 0.0 0.0
      vertex  1.0 0.0 0.6
      vertex  0.0 1.2 0.5
    endloop
  endfacet
endsolid
Above, we have three vertices - they define just ONE triangle. If the above is in a file, called single.stl for example, a 3D printer can take single.stl as input, and produce a 3D-printed output :)
3D printing! [cont'd]
We can use meshlab, netfabb Studio Basic, BS Contact etc. (all free programs) to view (and manipulate) .stl files (before 3D-printing them). Here is the PC binary for netfabb.
Or, it's much simpler to use this online viewer [obtained from https://www.viewstl.com/] for viewing .stl files!
Eg. our single triangle looks like this in netfabb:

3D printing! [cont'd]
Let us write code to output the following grid of tris:

3D printing! [cont'd]
Each square (or rect) is made of two tris, an 'upper' one, a 'lower' one. Like with image processing, we use a double for() loop to march through the grid verts, and output two tris each time:
for i=0; i<(N-1) (not N); i++
  for j from 0 to ..
    output upper tri
    output lower tri
Like we did earlier, we open a file stream for text output, and simply println() each tri's verts in the required format.
3D printing! [cont'd]
This is TriGrid.java, which outputs a grid.stl file that contains our triangulated grid.
The above is not very encapsulated (why?).. Here is a better version..
An aside (on exception handling): in the first version above, main() is where file opening occurs, so it (main()) throws an IOException (which its caller will handle). In the second version, createSTL() is where file opening happens, so that function needs to throw an IOException - but because its caller is inside main(), at the place where we call createSTL() we are able to catch() the exception that createSTL() might throw. But now we have a question: in the first version, who will catch the exception that main() is throwing? Answer: its caller, ie. the JVM. The general rule is that if an exception could happen, we can try{}catch(){} and handle it ourselves, or we can pass it up to our callers to handle, by using 'throws' syntax. Further, if we do decide to catch(){} it, we can re-throw it [inside catch(){}] to our caller via a 'throw' statement.
In this version, instead of setting 'z' to 0, we set it to a f(x,y), where x,y is a grid coordinate and f() returns a double.
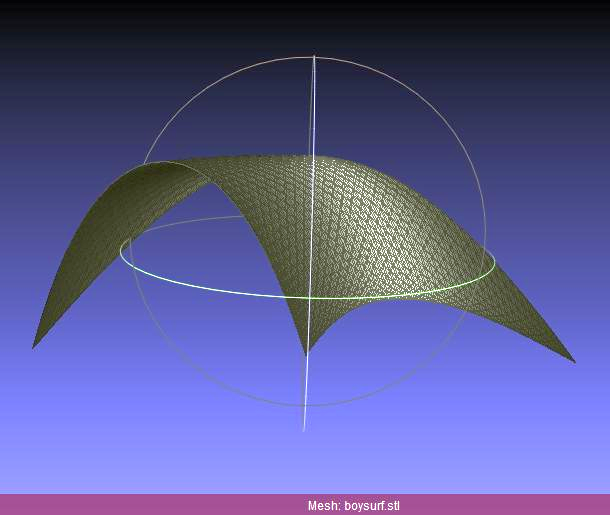
Boy's Surface
Boy's Surface is a pretty math surface, an example of 'parametric' surfaces - given a rectangular grid in uv parametric space, each grid point (u,v) is MAPPED to a 3D point (x,y,z) via a parametric equation (x=f(u,v),y=g(u,v),z=h(u,v)). So, if we apply such an equation to each grid vert (u,v), we can calculate our 3D surface triangle pair by triangle pair!
Here is what we have/want:

This is how we compute it, and here is a sample result .stl.
Create fun surfaces :)
By tweaking the parametric u,v eqns in calcPt(), you can come up with 100s (even 1000s!) of novel shapes for 3D-printing :) Here is a simple one:
I used these lines to calculate x,y,z (same u,v range as Boy's Surface):
    p.x = 4*Math.sin(Math.sin(Math.cos(Math.cos(u+v))));
    p.y = 3*Math.sin(Math.cos(Math.cos(u-v)));
    p.z = B*Math.cos(u)*Math.cos(v); // B=sqrt(2)